Setup Your Widget
How to create, customize and setup your JS Widget

Vladimir
Last Update 4 jaar geleden
Our Widget is a kind of filter that you add to your form to validate emails. Depending on the settings you specified, the widget can simply validate the addresses, the results of which will be available to you in the dashboard. Also the widget can prevent submitting invalid emails to your database at all.
You can also check the guide for advanced settings for your Widget and possbile technical issues here
1. Creating the Widget
Go to "API/Widgets" tab and press "Create App" button. Choose "Javascript Widget" and enter the name of your app. Hit "Create App" button. Now your brand new widget will appear in your dashboard.
2. Widget installation
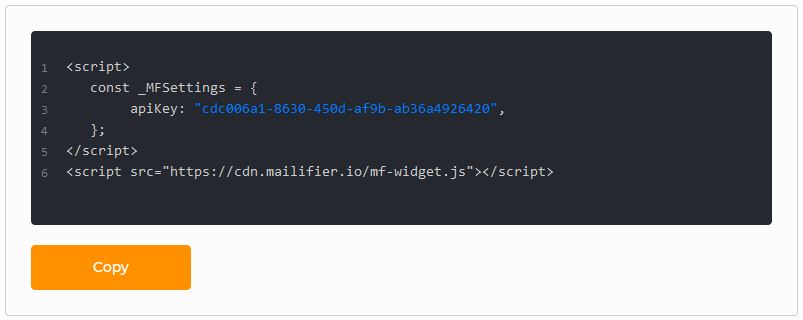
If everything works as it should, changes of settings will be applied to the Widget installed on your site automatically.
NOTE: You can use this code more than at one site/page. But if you want to get separate statistics for each page or use different settings - you must create different apps for every page.
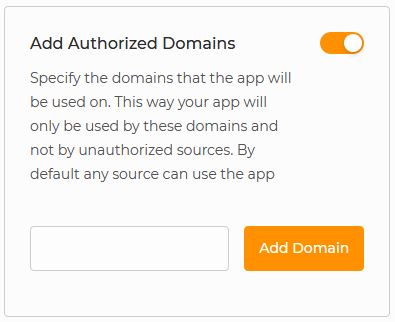
3. Adding authorized domains(optional)
By default any source can use the app. Specify the domains you need if you want the widget to process requests only from them. Use format www.xxxxxx.xx. More details here.
4. Prevent form submitting with invalid emails(optional)
You can enable this function if you need to get rid invalid emails right at submitting stage. Hit "Prevent Submitting Form" switch and specify types of email that should be forbidden to submit at "Rejected Groups" section.
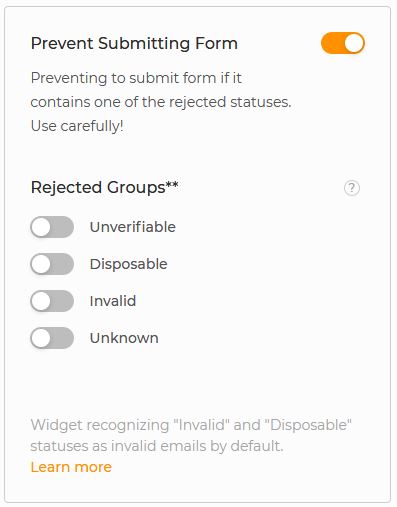
So, if you will turn this option on and specify all 4 rejected groups, for example, the form connected to this widget will be able to submit only emails with "Valid" status.
Note that checks credits will be consumed for validation of each email in the form, not just for submitted.
5. Customizing messages(optional)
You can also customize text of additional messages. Want to ask your subscribers to use professional email only and not temporary email? Or maybe you need to show loader while entered email validating in Spanish? Turn on "Message Customization" option and customize all that you need.